Showing posts with label design. Show all posts

30.5.09

Prom Dress '09


Here's this year's Prom Dress. There were many extra African American Quiz Bowl t-shirts this year, so I was able to get 3.

This was created by measuring for the bodice. It's a really simple shell with bust darts. The skirt is made with 2 shirt bodies with plenty of pleats for fullness. The skirt also has a kangaroo pocket concealed within the pleats. I created the waist panel with a doubled t-shirt hemline.

I dyed the finished piece with a procion dye. This should have produced a completely matched piece, but apparently the thread in the shirts and the thread I was using both contained too much polyester. They remained white. The flowers were sewn on afterward by hand. They each have a vintage shank button as the center.

It's totally customizable. I will definitely be making more of these.
Posted by Picasa

23.5.09

the ultimate neglect

Here are the few things I have done since February, which I have already ripped out. Even with my new policy of only pulling out legitimate mistakes I managed to accomplish almost nothing in 3 months.
 
This is the third iteration of this sweater. Still too short and misshapen.
 
Here is the base of an alpaca lace sweater that I already knit up and ripped out 3 times. I was totally winging it, and it took a lot of experimentation to find a suitable lace pattern. This particular version created strange gaps between the lace repeats. Later versions were lacking sufficient positive and negative space.
 
It was also a little too scalloped at the bottom. There was no real focus on scallops in the pattern, so it mostly just resembled a mistake. So I treated it like one and ripped it out. Since sipping out two more versions, I'm almost done with the current usable one.
Posted by Picasa

27.12.08

One redone

korchoran sweater

This is the image of me a year ago right before I took apart this sweater. Since then I've completed all but one and a half sleeves. Hopefully this means that the new version will be more wearable.

Some of the changes:
  • better raglan shaping means I can lift my arms without the sweater rising up
  • longer body means it will reach my waist
  • longer body ribbing provides better shape
  • v-neck should prevent a lot of the bad wool reaction I was having

I didn't do any of this over the summer. Now that I've picked it up again, I'm using my new rule: no changing my mind. As long as it fits, I will consider it done.

25.12.08

How to Crochet a Hat

- without a pattern -
hairycarrot crochet hats

If you know how to crochet in the round, you can make a hat.

The easiest way to start crochet in the round is to chain 2, then make 6 single crochet in the second chain from the hook. This is more single crochet than will reasonably fit in a single chain, causing it to curve around. This will create the beginning of a small circle. The first stitch and the last stitch you made will be touching. Make your next stitch in the top of the first stitch. For the second round, you will want to make 2 stitches in each stitch of the first round. Since the first round was 6 stitches, the second round will be 12.

From this point on, you only need 2 basic concepts to create a hat shape.

1. If you want to flatten out, add stitches as your circle starts to buckle. If you add only a few stitches it will create a rounded dome shape. If you add more stitches it will be flat. Just add them as you like.
2. When you want to create the sides of the hat, make no increases. This will create a tube. The tube should be about half of the hat. This will cover your ears.

24.12.08

Handmade Happy Hour

the driving cap

This is the beginning of the menswear line. I'm keeping it small. There are plenty of ideas that I never make because the motivation for their construction just doesn't exist. The driving cap was fun to create because it allowed me to use interesting pieces of fabric that were otherwise too narrow to make into other things. I also got to use my French curves to draft the pattern.

I sold my first one at CITYCRAFT. I'll be listing more in my etsy shop.

5.8.08

giotto top new yarn


giotto top new yarn, originally uploaded by hairycarrot.

This is the perfect match I found to complete my Giotto top. Even though I know I said it was finished, I hated the back. Now I can change it. The yarn is mission falls 1824 cotton.

close up of necklineRemember this?

It got worked on today. The back has been ripped out, and replaced with the lovely 1824 cotton. I was contemplating a lace panel, but I didn't like what I was seeing. The yarn didn't look like it matched as well with yarnovers. The last three rows of Giotto were knit with 2 strands of yarn together, and then the switch to just he cotton. The match really shows up well, and I expect to be finished tomorrow.

Sortof recycling


fused bags-4, originally uploaded by hairycarrot.

newspaper bag and grocery bag

I was intrigued by etsy's fused plastic bag tutorial, so I tried it for myself. Mine doesn't work the exact same way, but it's likely a difference in iron.

These are all made from 2-3 layers of bag, with the cut out words and letters (and handles) in between.

Here's how:

Setup. This is not a great kids activity. Irons are hot and plastic is toxic if you have a mishap.
Make sure you have good ventilation. If it smells bad when you do this, stop. If you can smell it, you can inhale it.

1. Cut the excess parts of your bags off. These are the seams and handles, plus any words you don't like. Cut open so you can lay them flat.

2. Layer 2-3 sheets of plastic flat on your ironing board. You should layer them between wax paper and/or copy paper. Test this to decide what works best with some scraps before you settle on the real thing.

3. Iron on the middle setting, whatever that may be. Press firmly and go quickly. Only about 5 seconds at first. Check to see if the bags have fused.

4. #2 plastic bags tend to shrink slightly when you fuse them together. Don't fuse a fresh piece of bag to a fused piece. This will result in different levels of tightening up, and the pieces will get holey. If you are using #4 plastic bags, they will shrink less. It is okay to mix them.

5. If the bags have fused to satisfaction, set on a hot pad and move to the next one. If more fusing is necessary, iron again quickly. Try only to iron on the parts that have not fused. The more you iron, the more the plastic shrinks.

6. The fused plastic can be sewn much like fabric.

For a completely fused piece without sewing - wrap the layers of plastic around something that they won't stick to. This can be a sheet of paper or wax paper, or a solid object wrapped in wax paper. Then you can iron the plastic together into a shape. Then no sewing is required.

20.7.08

Bikini Experiment - Failed Hypothesis


Well, the bottom is just not the right size for my butt. The pattern clearly warns about butt cleavage, but it doesn't account for the fact that I hate things coming up really high in the front, so even though I almost avoided the back being too low, the front was just way too high and the legs buckled at the crotch.


My first attempt at fixing it was to pull the front panel apart starting at the leg taper. I had already altered the pattern order to start at the leg tapering so that I could work the crotch from front to back and then pick up stitches to knit the body in the round. This meant I would be ripping the piece from the wrong end, which is usually more time consuming that is worth it. If you rip a piece from the starting point instead of the ending point, each row will end with pulling the entire length through the turn. This is tripled with the knit two together stitches.

Of course after I did that I still wasn't satisfied. The legs still buckled and the front was too high. So i took it apart and started over from scratch. At this point there's really no part of the original pattern in my bikini bottom. I'm starting at the crotch with the front leg tapering. I knit through to the back and then knit short row extensions of 35 stitches over 10 rows before picking up the front panel. Then it's knit in the round for another 10 rows. This makes a bottom that comes up significantly higher in the back and lower in the front, without the buckling at the legs.

The band is cast on in contrast and purled, then it wraps from the back to the front around the elastic. I'm using a kitchener stitch that matches the purls and knits which also gives the illusion of running stitch from the contrasting colors.

24.5.08

Yesterday was the prom

and this is the story of my dress.
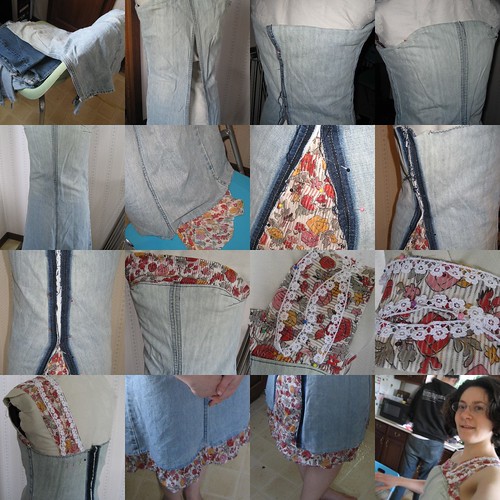
Making the Bacon Dress
More photoes on flickr

1. I started with the legs off a pair of bell-bottoms which I had converted into a skirt.
two legs1

2. Match the knees, which are the narrowest part on the bell-bottoms, and pin above the waist.
pinning the bodice2

3. Sew down the front seam. Pin and fold the bustline and darts.
bust darts3

4. Sew the bustline darts. I used a contrast thread to sew each detail. On a darker denim, I would use an orange thread.
darts sewn in4

5. The back needs a panel, so I used vintage material. It is pleated and pinned, in several layers. The zipper is angled to one side to keep the panel in one piece.
pinning the back zipper5

6. The back is not fitted until after the zipper is sewn into the raw edge. back before darts6

7. Match the back darts to the edge of the original seam allowance. No fabric has been cut away so far. Sew down the edge of your dart and again next to the zipper.
tacking down the center back7

8. Another piece of the vintage fabric is folded down its center and sewn in at the bust.
the bust detail8

9. Create a tube out of another strip of your fabric and press flat for the strap. Lace trim is used as the bacon fat.
pinned on bacon strap9

10. After the strap is sewn to the front, it is fitted and pinned to the back for sewing.
fitting the strap10

11. The last step is to add a hem extension with more vintage fabric. Folding it in half and pinning underneath the denim prevents the need for additional hemming and cutting.
hem extension11

Fin. Then I put it on and went to the prom.
strap sewn inFin

Since I'm not effective with shoes, I wore it with pink Chucks. The students didn't mind because they all looked great. Their theme was Oscar Night, and they all dressed the part. Super cute.

16.4.08

sockheel


sockheel, originally uploaded by hairycarrot.

This is the end of the decreasing short rows. The next step is to start working the back of the heel with increasing short rows.

I like how my first pair of socks is going. I just can't see myself following a pattern for future socks, though. It's just like sewing. I started doing that because I didn't like what was available to me, so I made my own clothes. They always fit better and required the same amount of work as alterations. I am not satisfied with the fit from most patterns or I don't have the yarn choice, so I usually don't finish patterns that I start. I more often than not end up designing my own thing to accommodate the yarn that I do have.
In the case of socks, most interesting patterns are top-down, which I just can't get behind. I prefer to knit toe-up. Once you make that switch, the rest of the pattern is pretty much a do-over. I also don't like the standard heel flap. Every time I see one, I think, "Why do people like that?" It's too triangular. It seems like it would be lots of fun to make, but I would never want to wear the sock. I would be too preoccupied with my triangle feet.

12.4.08

giotto top new yarn


giotto top new yarn, originally uploaded by hairycarrot.

This is the perfect match I found to complete my Giotto top. Even though I know I said it was finished, I hated the back. Now I can change it. The yarn is mission falls 1824 cotton.

I don't know where my size 11 needles are . . .

22.9.07

A new age is upon us

Sewing and yarn-crafts can be balanced, and I have figured it out - finally.
Tomorrow is Art Harvest, and Next weekend is I Made It 3. If you're in Pittsburgh, check them out. Check my calendar or drop me a line for directions.
hairycarrot. Get yours at bighugelabs.com/flickr