I was suspicious that I had gotten an awful lot of Hearts just on July 2nd. That's not really normal for not having listed many items. I thought that not only had I been in a Treasury, but it might have been on the front page. A quick flickr search revealed nothing, so I gave up. Then this morning I discovered blog search, which isn't really all that special coming from people who search the web by definition. In it, I found mention of me, on the front page! Hoorah.
Check these people out if you don't already know them. If you sell on etsy, you should like them.
31.7.08
20.7.08
Bikini Experiment - Failed Hypothesis

Well, the bottom is just not the right size for my butt. The pattern clearly warns about butt cleavage, but it doesn't account for the fact that I hate things coming up really high in the front, so even though I almost avoided the back being too low, the front was just way too high and the legs buckled at the crotch.

My first attempt at fixing it was to pull the front panel apart starting at the leg taper. I had already altered the pattern order to start at the leg tapering so that I could work the crotch from front to back and then pick up stitches to knit the body in the round. This meant I would be ripping the piece from the wrong end, which is usually more time consuming that is worth it. If you rip a piece from the starting point instead of the ending point, each row will end with pulling the entire length through the turn. This is tripled with the knit two together stitches.
Of course after I did that I still wasn't satisfied. The legs still buckled and the front was too high. So i took it apart and started over from scratch. At this point there's really no part of the original pattern in my bikini bottom. I'm starting at the crotch with the front leg tapering. I knit through to the back and then knit short row extensions of 35 stitches over 10 rows before picking up the front panel. Then it's knit in the round for another 10 rows. This makes a bottom that comes up significantly higher in the back and lower in the front, without the buckling at the legs.
The band is cast on in contrast and purled, then it wraps from the back to the front around the elastic. I'm using a kitchener stitch that matches the purls and knits which also gives the illusion of running stitch from the contrasting colors.
15.7.08
The Bikini Experiment - Trial Two
I undid and reworked the front panel on the bikini bottom, to account for the weird leg tapering. It would have made sense if I wasn't scaling down the project, but since it's smaller than their small size, the shaping needed to be more abrupt.
But wouldn't you know it, I can't find my plastic needle to do kitchener stitch! I had it only a few hours ago. I think I might have mailed it out with an etsy order. I do own more than one plastic needle, but seriously. It's like I am doomed to never finish a project.
I'm going to dig out another needle and finish. This suit is getting done!
I have nothing to do with music
I know very little about it. It's not one of my skills.
This website is one of the neatest ideas I've seen in a while. If you like what they are doing, you should donate some money so they can do it some more.
This website is one of the neatest ideas I've seen in a while. If you like what they are doing, you should donate some money so they can do it some more.
10.7.08
The Bikini Experiment - Analysis of the Data
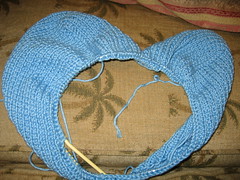 Bikini Top - First Go
My bikini top was completely finished. This shot shows the band being picked up. It was the perfect width. I knitted my casing, but when I drew the elastic through it, a stitch got snagged on the interior, requiring me to reknit. No worries there, because 6-8 rows go by so fast. I triumphantly tried on my creation, and immediately decided to reknit the whole top smaller, except for the total band length. That would have to stay the same.

If you are aware of this pattern, you can see that the sizing up and down results in the band length going up and down with it. So to solve around this, I made a spreadsheet. Excel has to be the best program in the world for doing knitting calculations. Decide on your formula and fill series for size options, do calculations for pattern repeats, and generally save yourself a lot of paper.
To resize this pattern, I set up my spreadsheet like this:
| Row # | # vertical st | # side st | total stitches |
| 1 | =[# vertical st] -(rounddown[Row #]/4) | =roundup([# vertical st]/2) | =[# vertical st] + [# side st] |
| ** | ** | ** | ** |
Then, I filled series down for about 30 rows. Since I knew how many stitches I wanted to have on my needle when you make the turn in the cup, I was able to select from the rows that provided the desired number of stitches. Note that some of these Excel terms might be spelled wrong, but Excel will give you the correct spelling if you search in the help menu. These are spelled to give you the understanding of what they do. Excel is powerful. Use it.
I just finished the second cup last night at D&D. I'm picking up the stitches for the band this weekend, and hope to have it finished by Monday.
The bottom is finished, including the elastic in the casing. I'm not satisfied with the shaping in the front, so I might rip that portion and reknit.
7.7.08
scrap crochet bedspread
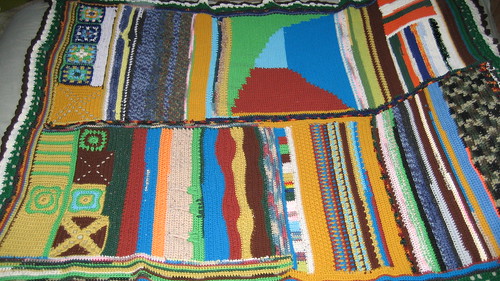
Being impatient and experimental made me create this blanket. Most people I knew at the time, if presented with a box of scraps, ball ends, and single skeins would have thought, "gee, a box of junk." I saw my mom's stash of random and said, "Perfect. I'll make a blanket."
I went through the Columbia Minerva Crochet stitch dictionary and tried out any pattern with a base height of one. It's worked in 2 long panels from three people's somewhat dated leftovers. The edging is a combination of three patterns, modified to fit together.
Subscribe to:
Posts (Atom)


