Series of things are awesome. It's probably because the brain craves repetition. I just discovered this series at its end. It's wonderful. Click through for the images. It's totally worth it.
This makes me wish I had more to show for my efforts. I was recently wondering where I spent all my time, and realized that I have redone most of my projects immediately after finishing them. Then end result is that I feel like I've accomplished nothing. I've had to start a new rule, where I am not allowed to change my mind, only fix mistakes. More on that later.
And, for amusement: Knitted bus cozy and more.
28.12.08
27.12.08
One redone

This is the image of me a year ago right before I took apart this sweater. Since then I've completed all but one and a half sleeves. Hopefully this means that the new version will be more wearable.
Some of the changes:
- better raglan shaping means I can lift my arms without the sweater rising up
- longer body means it will reach my waist
- longer body ribbing provides better shape
- v-neck should prevent a lot of the bad wool reaction I was having
I didn't do any of this over the summer. Now that I've picked it up again, I'm using my new rule: no changing my mind. As long as it fits, I will consider it done.
26.12.08
I Win

I don't need to get any more presents basically forever, unless someone wants to get me sheep; I got a spinning wheel - and it's made in Canada.
Christmas can be canceled next year. I'm set. Now I can spin through all the things that I was saving to spin when it was cold. It's cold and I have a wheel. Plus I got some great fiber from Natasha which will be great on my spindle. I have lots to do and a week more off of work to play.
25.12.08
How to Crochet a Hat
- without a pattern -

If you know how to crochet in the round, you can make a hat.
The easiest way to start crochet in the round is to chain 2, then make 6 single crochet in the second chain from the hook. This is more single crochet than will reasonably fit in a single chain, causing it to curve around. This will create the beginning of a small circle. The first stitch and the last stitch you made will be touching. Make your next stitch in the top of the first stitch. For the second round, you will want to make 2 stitches in each stitch of the first round. Since the first round was 6 stitches, the second round will be 12.
From this point on, you only need 2 basic concepts to create a hat shape.
1. If you want to flatten out, add stitches as your circle starts to buckle. If you add only a few stitches it will create a rounded dome shape. If you add more stitches it will be flat. Just add them as you like.
2. When you want to create the sides of the hat, make no increases. This will create a tube. The tube should be about half of the hat. This will cover your ears.
24.12.08
Handmade Happy Hour

This is the beginning of the menswear line. I'm keeping it small. There are plenty of ideas that I never make because the motivation for their construction just doesn't exist. The driving cap was fun to create because it allowed me to use interesting pieces of fabric that were otherwise too narrow to make into other things. I also got to use my French curves to draft the pattern.
I sold my first one at CITYCRAFT. I'll be listing more in my etsy shop.
Beer Rabbit

We were in charge of dinner yesterday. The original thought was fish curry, but they had whole rabbits at Wegmans. Beer rabbit is made using the same concept as beer chicken, but with the added steps of dredging and roux. Nom Nom.
28.11.08
Buy awesome stuff from Luxe
STITCH SEW AND SHOP
SATURDAY NOV. 29th and SUNDAY NOV. 30th
We are hosting two fabulous designers Thanksgiving weekend. For Saturday and Sunday only, meet two hip crafters while shopping for unique finds for the peeps on your list.
The Picket Fence brings handmade to you!
Luxe Fibre....beautiful handmade lovelies made in a one-woman studio in Pennsylvania. Luxe hand spins, dyes and knits super soft neck warmers, scarves and caplets. Chat with her about a custom piece for the holiday or pick up a skein or two of her home-brewed yarn for the knitters in your life!
Luxe Fibre
Little Hip Squeak Organic
It all started for her love of textiles, and to sew. With her own little baby boy, she started to buy blank tee shirts in bright colors, and sew cool stuff to them. People loved them and asked her for a card. Card? What card?
Certified organic
no hohum colors available
Little Hip Squeak
Saturday, November 29th from 10 to 6
Sunday, November 30th from 12 to 4
THE PICKET FENCE
5425 Walnut Street
Pittsburgh, Pennsylvania 15232
412.246.0350
http://www.picketfenceshadyside.com
info@picketfenceshadyside.com
27.11.08
Macy's Made It Awesome
I don't usually enjoy any part of the Macy's parade, but this year was super special.
This video wasn't made at my house, but this is what my brother and I sounded like when it happened. Then I had to explain Rick-rolling to my father.
In more sewing and knitting related news, when my holiday is over I am going to unveil some new hooded scarves and bags. My next show is on the 17th of December. I have a couple new finger puppets planned, too.
27.9.08
Flickr Knees Mosaic
You know it's a long week when I sit down to my computer and all the stuff I had from the night before is still sitting on my computer unsent!
Here are the links to the images in my mosaic. I kept up my motifs of rats, tattoos, and knitting, with an overarching theme of knees.
1. Untitled, 2. That Blue Dress., 3. Elephant tattoo, 4. Untitled, 5. Humphry having a sniff, 6. Knee, 7. On my knee, 8. Rat in mi kitchen, 9. bzzz, 10. Jonathan, knees, 11. 14/365, 12. knitting knees, 13. Cute Rat
23.9.08
recent tatting pics
This is a list of tatting images I favorited for a swapbot flickr mosaic swap. They are all really interesting and nice images of tatting.
1. Wire Tatting (Project 365 - Day 26/365), 2. Tatting Motif, 3. antique tatting, 4. Pink Ivory Wood Tatting Shuttle with Cameo Inlay, 5. Tatted Lace, 6. antique tatting, 7. Tatted lace and Thread, 8. tatting, 9. After::Tatted necklace, 10. Tatting with new shuttle, 11. TAT, 12. tatting samples, 13. Handmade Tatting Shuttle - Hidden Gem, 14. Tatted Dragonfly, 15. Grandma Rosie's Tatting Shuttle, 16. As The World Falls Down - The Tatted Mask, 17. Minor Norwegian Dragon, 18. Blue Potato Vine Blossom and Tatting (three)
1. Wire Tatting (Project 365 - Day 26/365), 2. Tatting Motif, 3. antique tatting, 4. Pink Ivory Wood Tatting Shuttle with Cameo Inlay, 5. Tatted Lace, 6. antique tatting, 7. Tatted lace and Thread, 8. tatting, 9. After::Tatted necklace, 10. Tatting with new shuttle, 11. TAT, 12. tatting samples, 13. Handmade Tatting Shuttle - Hidden Gem, 14. Tatted Dragonfly, 15. Grandma Rosie's Tatting Shuttle, 16. As The World Falls Down - The Tatted Mask, 17. Minor Norwegian Dragon, 18. Blue Potato Vine Blossom and Tatting (three)
14.9.08
busy busy
This weekend was super busy, and I didn't even do anything.
This would have been a big Twilight Market week, with the poetry festival that happened yesterday, if not for the insane weather. The reports claimed all day rain, with heat. Everyone decided to wait until a later week for the weather to calm down. Of course, it got beautiful right at 3, when people were busy elsewhere.
I however, was already set to miss because this weekend was the Steel City Big Pour. It seemed even bigger than last year, with more food, vendors, and beer. I got the designated driver ticket. The weather was so much hotter than I expected for September.
Next weekend is even busier, with a potential two shows in two days (intense) and our team craft night on Friday. Plus, I've been rabidly swapping on swap-bot.
7.9.08
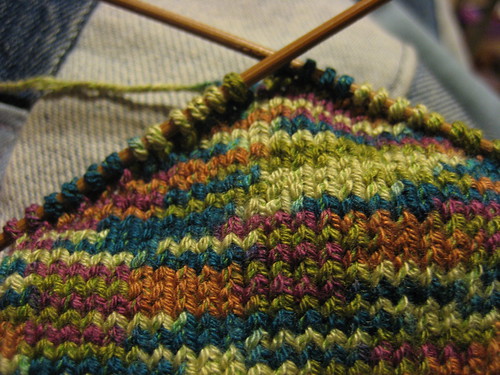
ready for kitchener
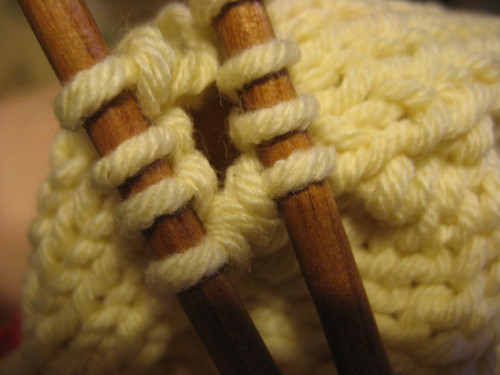
I love when I get to the end of a piece and I'm ready for kitchener stitch. It's exciting to be almost finished, and kitchener is fun.
This piece ends with two four-count knit rows. The tops meet, making an improper kitchener join. To counter, I offset the two sides creating a mild slope.
Each side, viewed from its own perspective, is slightly to the right of the other. It has 180 degree rotational symmetry.
6.9.08
Hosting at Swapbot
or why I don't like markdown syntax.

I created a swap on Swapbot to make more flickr mosaics. They are fun and easy, and I like making them.
Here it is.
Everything about swapbot is pretty straightforward. -Except-
you can't use html. You have to use markdown syntax, which gets converted into html!? (insert interrobang here)
What is wrong with just using html? Most sites just clip whatever html they don't allow. I am not fond of using systems to replace systems I already know, which just create new rules to interpret existing rules.
Back to the swap at hand: it's about hobbies. People are making flickr mosaics of any hobby they choose. I specified any number between 12-25 images, because not everything has to be 4x4. Variety is fun.
5.9.08
underwear ATC swap

The Panties ATC swap was fun. I remembered swapbot at the end of vacation and have been making ATCs ever since. Not that I haven't been doing other things, but most of my knitting and sewing has been personal this month. There are some new clothes on the way, so I'll talk about that soon enough.
17.8.08
i fail it
I have been completely dysfunctional for two days, and today is apparently not much better.
Yesterday I had to finish some sewing before going to Twilight Market, which was not unreasonable, but I also wanted to wash my items because they got wrinkly. Also, reasonable, until I can't get them into the wash until 2:30, when I'm supposed to leave at 3:30.
I didn't get out the door until 4:00, the time I was supposed to be there, because I couldn't find anything. If I needed it I couldn't find it. On top of that I forgot my camera. So there are no pictures proving that SilentLotus, VintageHotcakes, hairycarrot, LzRocks, or CharmedbyNature were ever anywhere.
I managed to deliver the box of yarn that I wanted Cosy to have, but forgot the magazine pages I had ripped out especially for her.
So today I thought I could recover, as the only thing left to do was apply to Handmade Arcade. I'm pretty sure I screwed that up, too. I had everything perfect and then when I paid my fee, I forgot to put my name in the subject line of the paypal transaction, so I'm probably not getting in. Argh.
10.8.08
thingy
 vintage thingy
I just got a box of yarn (after a bag of yarn) busting with old and vintage yarns. In the bottom was this crazy tool which comes apart. The base is pretty obvious to determine the use. You turn the knob at the bottom and spokes pop out. It's for making flower embellishments. It's one of those fancy ones, too. The spokes go in and out. When you're finished, you pop off the flower like they do on tv.
The thing for the top is a mystery to me. It fits in the holes on the base. I can't really see what you would do with it. It's not a cord loom because it lacks the center tube to extrude the cord. It has 4 posts, each with two spikes. It fits on the base by 2 posts, even though the base has 4 holes. There doesn't appear to be any difference in directionality. And you can extend and retract the spokes for the loom while it is in place. No idea, seriously.
8.8.08
be fast
This is what I want to do.
This is Lily Chin. She won the title in the international speed crochet competition. If this video was a little longer you would see just how much she is getting done.
I can be fast frequently, but her starting row is remarkable. Once you have the first row, the crochet tends to behave itself. Crocheting into a solitary chain is more difficult because it moves a lot. It is harder to control.
5.8.08
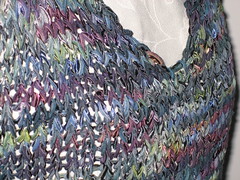
giotto top new yarn
This is the perfect match I found to complete my Giotto top. Even though I know I said it was finished, I hated the back. Now I can change it. The yarn is mission falls 1824 cotton.
 Remember this?
It got worked on today. The back has been ripped out, and replaced with the lovely 1824 cotton. I was contemplating a lace panel, but I didn't like what I was seeing. The yarn didn't look like it matched as well with yarnovers. The last three rows of Giotto were knit with 2 strands of yarn together, and then the switch to just he cotton. The match really shows up well, and I expect to be finished tomorrow.
Twilight Market

1. go team pittsburgh!, 2. farmer's market, 3. new clothing rack, 4. satisfied customer
Created with fd's Flickr Toys.
Created with fd's Flickr Toys.
The Twilight Market is a great time. The nice thing about farmer's markets is that they are open for the season. I got incredible vegetables for a great price, and they were so much nicer than the store's. This is the only thing as good as shopping at Wegman's.
I bought a bunch of dill, and used it to make pickles. Since I have 6 cucumber plants I have a lot of cucumbers. They are just regular ones. I will never need to buy cucumbers.
It's a great time. The farmers are there every week, and we get to be there on alternating weeks.
I'm planning to be there.
I sold 2 items, which was about 15% of what I brought, so I'm happy. I also have some great inspiration for new items to make for next time. I haven't solved my hanger problem, which is that I need some with clippies. My sewing room is almost finished after I moved it from the basement to the spare bedroom. Double inspiration is that I have some company coming.
Sortof recycling

newspaper bag and grocery bag
I was intrigued by etsy's fused plastic bag tutorial, so I tried it for myself. Mine doesn't work the exact same way, but it's likely a difference in iron.
These are all made from 2-3 layers of bag, with the cut out words and letters (and handles) in between.
Here's how:
Setup. This is not a great kids activity. Irons are hot and plastic is toxic if you have a mishap.
Make sure you have good ventilation. If it smells bad when you do this, stop. If you can smell it, you can inhale it.
1. Cut the excess parts of your bags off. These are the seams and handles, plus any words you don't like. Cut open so you can lay them flat.
2. Layer 2-3 sheets of plastic flat on your ironing board. You should layer them between wax paper and/or copy paper. Test this to decide what works best with some scraps before you settle on the real thing.
3. Iron on the middle setting, whatever that may be. Press firmly and go quickly. Only about 5 seconds at first. Check to see if the bags have fused.
4. #2 plastic bags tend to shrink slightly when you fuse them together. Don't fuse a fresh piece of bag to a fused piece. This will result in different levels of tightening up, and the pieces will get holey. If you are using #4 plastic bags, they will shrink less. It is okay to mix them.
5. If the bags have fused to satisfaction, set on a hot pad and move to the next one. If more fusing is necessary, iron again quickly. Try only to iron on the parts that have not fused. The more you iron, the more the plastic shrinks.
6. The fused plastic can be sewn much like fabric.
For a completely fused piece without sewing - wrap the layers of plastic around something that they won't stick to. This can be a sheet of paper or wax paper, or a solid object wrapped in wax paper. Then you can iron the plastic together into a shape. Then no sewing is required.
31.7.08
Super Late Front Page Yay!
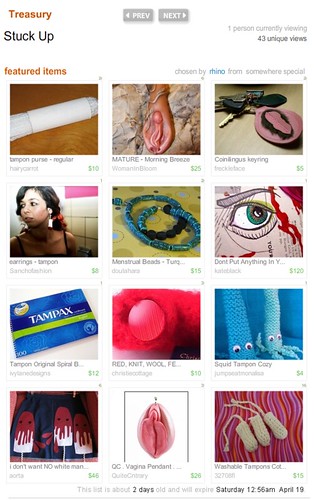
I was suspicious that I had gotten an awful lot of Hearts just on July 2nd. That's not really normal for not having listed many items. I thought that not only had I been in a Treasury, but it might have been on the front page. A quick flickr search revealed nothing, so I gave up. Then this morning I discovered blog search, which isn't really all that special coming from people who search the web by definition. In it, I found mention of me, on the front page! Hoorah.
Check these people out if you don't already know them. If you sell on etsy, you should like them.
Check these people out if you don't already know them. If you sell on etsy, you should like them.
20.7.08
Bikini Experiment - Failed Hypothesis

Well, the bottom is just not the right size for my butt. The pattern clearly warns about butt cleavage, but it doesn't account for the fact that I hate things coming up really high in the front, so even though I almost avoided the back being too low, the front was just way too high and the legs buckled at the crotch.

My first attempt at fixing it was to pull the front panel apart starting at the leg taper. I had already altered the pattern order to start at the leg tapering so that I could work the crotch from front to back and then pick up stitches to knit the body in the round. This meant I would be ripping the piece from the wrong end, which is usually more time consuming that is worth it. If you rip a piece from the starting point instead of the ending point, each row will end with pulling the entire length through the turn. This is tripled with the knit two together stitches.
Of course after I did that I still wasn't satisfied. The legs still buckled and the front was too high. So i took it apart and started over from scratch. At this point there's really no part of the original pattern in my bikini bottom. I'm starting at the crotch with the front leg tapering. I knit through to the back and then knit short row extensions of 35 stitches over 10 rows before picking up the front panel. Then it's knit in the round for another 10 rows. This makes a bottom that comes up significantly higher in the back and lower in the front, without the buckling at the legs.
The band is cast on in contrast and purled, then it wraps from the back to the front around the elastic. I'm using a kitchener stitch that matches the purls and knits which also gives the illusion of running stitch from the contrasting colors.
15.7.08
The Bikini Experiment - Trial Two
I undid and reworked the front panel on the bikini bottom, to account for the weird leg tapering. It would have made sense if I wasn't scaling down the project, but since it's smaller than their small size, the shaping needed to be more abrupt.
But wouldn't you know it, I can't find my plastic needle to do kitchener stitch! I had it only a few hours ago. I think I might have mailed it out with an etsy order. I do own more than one plastic needle, but seriously. It's like I am doomed to never finish a project.
I'm going to dig out another needle and finish. This suit is getting done!
I have nothing to do with music
I know very little about it. It's not one of my skills.
This website is one of the neatest ideas I've seen in a while. If you like what they are doing, you should donate some money so they can do it some more.
This website is one of the neatest ideas I've seen in a while. If you like what they are doing, you should donate some money so they can do it some more.
10.7.08
The Bikini Experiment - Analysis of the Data
 Bikini Top - First Go
My bikini top was completely finished. This shot shows the band being picked up. It was the perfect width. I knitted my casing, but when I drew the elastic through it, a stitch got snagged on the interior, requiring me to reknit. No worries there, because 6-8 rows go by so fast. I triumphantly tried on my creation, and immediately decided to reknit the whole top smaller, except for the total band length. That would have to stay the same.

If you are aware of this pattern, you can see that the sizing up and down results in the band length going up and down with it. So to solve around this, I made a spreadsheet. Excel has to be the best program in the world for doing knitting calculations. Decide on your formula and fill series for size options, do calculations for pattern repeats, and generally save yourself a lot of paper.
To resize this pattern, I set up my spreadsheet like this:
| Row # | # vertical st | # side st | total stitches |
| 1 | =[# vertical st] -(rounddown[Row #]/4) | =roundup([# vertical st]/2) | =[# vertical st] + [# side st] |
| ** | ** | ** | ** |
Then, I filled series down for about 30 rows. Since I knew how many stitches I wanted to have on my needle when you make the turn in the cup, I was able to select from the rows that provided the desired number of stitches. Note that some of these Excel terms might be spelled wrong, but Excel will give you the correct spelling if you search in the help menu. These are spelled to give you the understanding of what they do. Excel is powerful. Use it.
I just finished the second cup last night at D&D. I'm picking up the stitches for the band this weekend, and hope to have it finished by Monday.
The bottom is finished, including the elastic in the casing. I'm not satisfied with the shaping in the front, so I might rip that portion and reknit.
7.7.08
scrap crochet bedspread
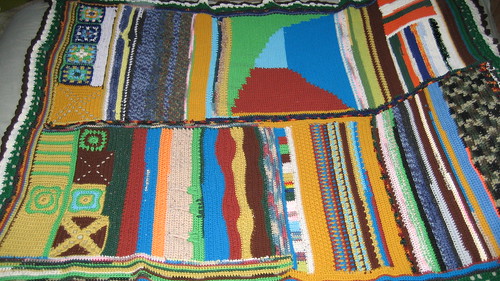
Being impatient and experimental made me create this blanket. Most people I knew at the time, if presented with a box of scraps, ball ends, and single skeins would have thought, "gee, a box of junk." I saw my mom's stash of random and said, "Perfect. I'll make a blanket."
I went through the Columbia Minerva Crochet stitch dictionary and tried out any pattern with a base height of one. It's worked in 2 long panels from three people's somewhat dated leftovers. The edging is a combination of three patterns, modified to fit together.
28.6.08
instructions i almost follow
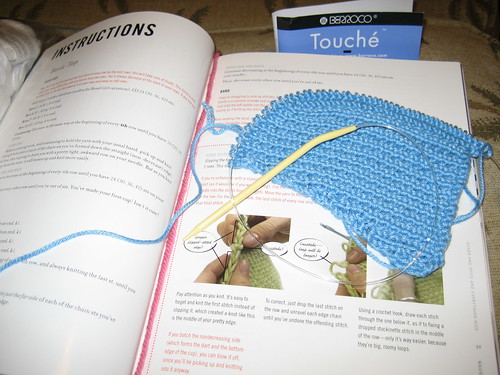
I should have posted this sooner, but yeah right. I'm loving the Great Bikini Experiment. I'm trying really hard to follow the pattern, and I almost did it. I've got everything there but the garter stitch. I'm using a seed stitch rib instead. This way I only have to knit on the front, and k1p1 across the back for the first cup and purl across the back and k1p1 on the front for the second cup. I like to repeat stitches heavily, even though they are essentially the opposite of each other. There is not reason for this, other than my own entertainment.
Of course, when I got to the second cup, I had to reverse all the shaping and the cast on. I was starting on the back side of the cup instead of the front. I use the Old Norwegian cast on for stretch. On the second side, I completely inverse this so that my working on the wrong side still produces a matching edge.
With the shaping, I switch from decreasing at the beginning of wrong side rows (pattern method) to the end of right side rows. Of course, this is still the same row numbers as in the pattern, but sounds completely different from description.
31.5.08
tablestitch
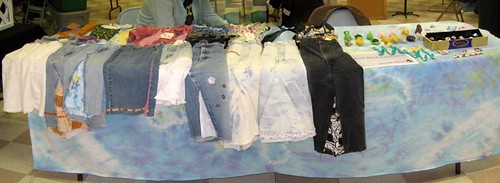
Image stitch of my table at the Distinguished Dobermans Fundraiser in Pgh.
19 moons was also in attendance.
19 moons was also in attendance.
This was a nice show. Traffic was pretty light, but the people who came were shopping. I'd like to do this show again.
We used to have this huge craft show back home in Tonawanda, and the people who shopped at it were completely insane. It was a madhouse, seriously. The thing was, this event was huge. It was so big that every year people parked illegally in the street and the cops looked the other way. People at the show cleaned up. They charged admission just for people to go in, plus their table fees for the vendors. It was in the same location every year, and kept getting bigger. For as wonderful as it was, I was glad when it ended because the guy running it was a huge jerk, and the customers used to block all the driveways on my street.
Honestly, it wasn't special. It was just incredibly well known. It had the benefit of consistency. People always knew it was coming and what to expect. All the shows around Pgh that I hear about become more popular as they build a foundation. This show could be a regular event in a couple short years. The location was good, the group was known and had a following, and the weather was great. Father's Day isn't a huge craft show holiday, but if we got it just a little closer to one, then that might be all it needs to gain momentum.
Having dogs there was great, too. Those dogs were so sweet and friendly.
30.5.08
Show Tomorrow!

This show is hosted by Distinguished Dobermans, Inc.
Our Lady of the Angels Parish
Holy Family Social Hall
256 44th Street
Lawrenceville, PA 15201
View Larger Map
I'm really excited because there will be dogs there. I'm not really looking for a dog, but these things really sometimes introduce you to the "perfect" dog. I don't have a fence, and I have rats, so that narrows the choices a lot.
I'm premiering a new item for this show. I've made a few flower bracelets. I've given some to students, and I have a bunch more for tomorrow. I wish I didn't have a regular job so I could make more stuff. It's really eating into my crafting time. But, since crafting doesn't really rake in the cash, I'll be keeping my day job. I would be much more productive if I didn't fall asleep on the bus every day.
24.5.08
Yesterday was the prom
and this is the story of my dress.
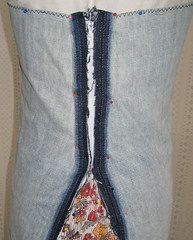
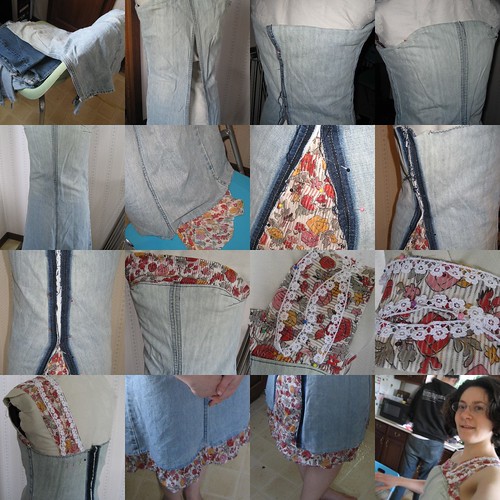 Making the Bacon Dress
More photoes on flickr
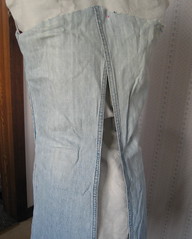
1. I started with the legs off a pair of bell-bottoms which I had converted into a skirt.
 1
1
2. Match the knees, which are the narrowest part on the bell-bottoms, and pin above the waist.
 2
2
3. Sew down the front seam. Pin and fold the bustline and darts.
 3
3
4. Sew the bustline darts. I used a contrast thread to sew each detail. On a darker denim, I would use an orange thread.
 4
4
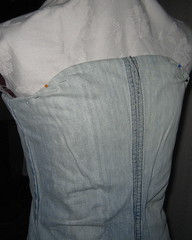
5. The back needs a panel, so I used vintage material. It is pleated and pinned, in several layers. The zipper is angled to one side to keep the panel in one piece.
 5
5
6. The back is not fitted until after the zipper is sewn into the raw edge.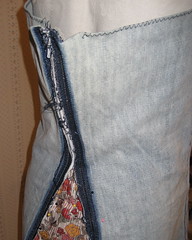 6
6
7. Match the back darts to the edge of the original seam allowance. No fabric has been cut away so far. Sew down the edge of your dart and again next to the zipper.
 7
7
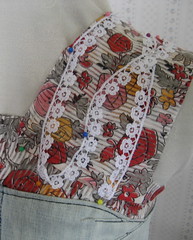
8. Another piece of the vintage fabric is folded down its center and sewn in at the bust.
 8
8
9. Create a tube out of another strip of your fabric and press flat for the strap. Lace trim is used as the bacon fat.
 9
9
10. After the strap is sewn to the front, it is fitted and pinned to the back for sewing.
 10
10
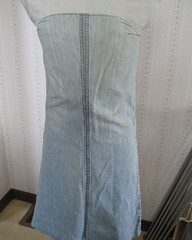
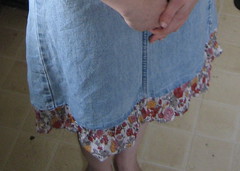
11. The last step is to add a hem extension with more vintage fabric. Folding it in half and pinning underneath the denim prevents the need for additional hemming and cutting.
 11
11
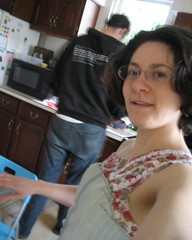
Fin. Then I put it on and went to the prom.
 Fin
Fin
Since I'm not effective with shoes, I wore it with pink Chucks. The students didn't mind because they all looked great. Their theme was Oscar Night, and they all dressed the part. Super cute.
Making the Bacon DressMore photoes on flickr
1. I started with the legs off a pair of bell-bottoms which I had converted into a skirt.
12. Match the knees, which are the narrowest part on the bell-bottoms, and pin above the waist.
23. Sew down the front seam. Pin and fold the bustline and darts.
34. Sew the bustline darts. I used a contrast thread to sew each detail. On a darker denim, I would use an orange thread.
45. The back needs a panel, so I used vintage material. It is pleated and pinned, in several layers. The zipper is angled to one side to keep the panel in one piece.
56. The back is not fitted until after the zipper is sewn into the raw edge.
67. Match the back darts to the edge of the original seam allowance. No fabric has been cut away so far. Sew down the edge of your dart and again next to the zipper.
78. Another piece of the vintage fabric is folded down its center and sewn in at the bust.
89. Create a tube out of another strip of your fabric and press flat for the strap. Lace trim is used as the bacon fat.
910. After the strap is sewn to the front, it is fitted and pinned to the back for sewing.
1011. The last step is to add a hem extension with more vintage fabric. Folding it in half and pinning underneath the denim prevents the need for additional hemming and cutting.
11Fin. Then I put it on and went to the prom.
FinSince I'm not effective with shoes, I wore it with pink Chucks. The students didn't mind because they all looked great. Their theme was Oscar Night, and they all dressed the part. Super cute.
22.5.08
daffodil bracelet
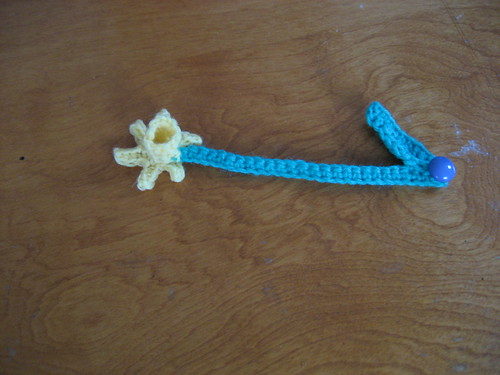
I gave this to a student. Surprisingly she wears it. I am surprised when my students like things I make. Generally we share no style.
Right after bacon I thought the next obvious choice was floral bracelets. The button can be hooked inside the flower. I have also made a zinnia, to be uploaded later. First I must finish my prom dress. Prom is tomorrow, and since I've been using a bacon theme for five weeks, in any class I can manage it, the dress was inspired by it. The reveal is tomorrow.
18.5.08
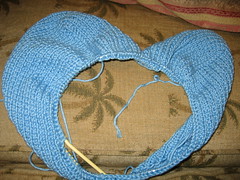
left sock

I'm starting the left sock in my toe-up socks. The right sock finished up nicely with a substantial cuff. Just by trying it on, I'm wondering how people like making their own socks. This is fairly thin yarn, knit on size 1 needles. It's still pretty thick on my foot. The tedium required to get socks as thin as those in stores would just be so much more trouble than it is worth. That was one of the benefits of the industrial revolution - we got to make much thinner knitwear.
I'm not even bothered by knitting the left sock now that the right one is finished. I just think my feet will look big.
4.5.08
the bacon cuff
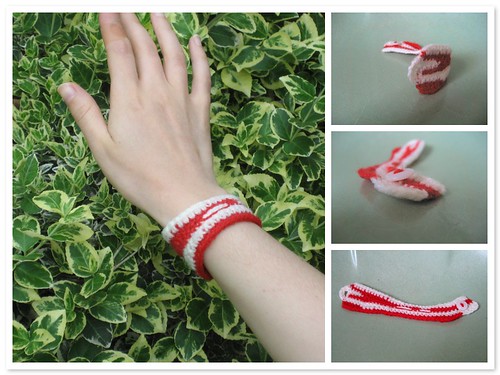
The versatility of bacon with the convenience of jewelry.
People are already jealous.
Created with fd's Flickr Toys.
People are already jealous.
Created with fd's Flickr Toys.
I started making these bacon cuffs just as strips of bacon, to illustrate the importance of bacon for the Spanish class I am subbing. The kids couldn't decide between "weird" or "awesome". They've been popular items to pass around either way.
Seeing one girl playing with it made me decide it would be a great cuff with a button. I immediately made one when I got home, and the next day, people were totally jealous.
26.4.08
CITYCRAFT MARKET is tomorrow
Tomorrow I will have a table at the CITYCRAFT MARKET. This even is put on by our own Etsy Pittsburgh Street Team. I expect it to go well. We will be in the Creative Treehouse, above the ill-fated 517-521 department store. The entrance is on the side of the building, on Meade Street. That's right across from the parking lot, where you only pay a quarter for over an hour. It's a great deal.
I'll be there with finger puppets and upcycled clothing. I have a new finger puppet to unveil tomorrow. I'm not sure if I have quite enough stuff, but I really plan to take orders for larger orders tomorrow, since I don't think this will be a big kid/immediate satisfaction crowd. There's even going to be a business only session before we open up to the general public. I'll, of course, bring yarn with me to make more puppets. Probably rats.
I'll be there with finger puppets and upcycled clothing. I have a new finger puppet to unveil tomorrow. I'm not sure if I have quite enough stuff, but I really plan to take orders for larger orders tomorrow, since I don't think this will be a big kid/immediate satisfaction crowd. There's even going to be a business only session before we open up to the general public. I'll, of course, bring yarn with me to make more puppets. Probably rats.
18.4.08
Stuck Up
16.4.08
sockheel
This is the end of the decreasing short rows. The next step is to start working the back of the heel with increasing short rows.
I like how my first pair of socks is going. I just can't see myself following a pattern for future socks, though. It's just like sewing. I started doing that because I didn't like what was available to me, so I made my own clothes. They always fit better and required the same amount of work as alterations. I am not satisfied with the fit from most patterns or I don't have the yarn choice, so I usually don't finish patterns that I start. I more often than not end up designing my own thing to accommodate the yarn that I do have.
In the case of socks, most interesting patterns are top-down, which I just can't get behind. I prefer to knit toe-up. Once you make that switch, the rest of the pattern is pretty much a do-over. I also don't like the standard heel flap. Every time I see one, I think, "Why do people like that?" It's too triangular. It seems like it would be lots of fun to make, but I would never want to wear the sock. I would be too preoccupied with my triangle feet.
12.4.08
giotto top new yarn
This is the perfect match I found to complete my Giotto top. Even though I know I said it was finished, I hated the back. Now I can change it. The yarn is mission falls 1824 cotton.
I don't know where my size 11 needles are . . .
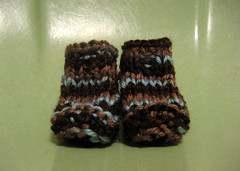
baby rib socks
I made these baby socks for a friend at work. I followed up with a matching hat, which I forgot to photograph. The socks are knit, and the hat was crocheted.
I didn't wrap it or make a card - just stuck it in his mailbox. I don't know why.
I didn't wrap it or make a card - just stuck it in his mailbox. I don't know why.
8.4.08
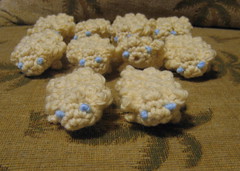
ten sheep
I got my first Alchemy order on etsy, and it was great! A person wanted 10 sheep for Sunday school, and they all fit in one envelope.
This is the new version of the sheep, and I like them so much better than my original version. They have more detail and a definite pattern. These things are key for me liking a puppet I make. I want them all to be equally interesting.
This is the new version of the sheep, and I like them so much better than my original version. They have more detail and a definite pattern. These things are key for me liking a puppet I make. I want them all to be equally interesting.
7.4.08
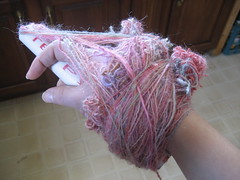
luxe pink locks - wrapped for plying
I plied my singles that I spun from locks. They came from luxe, and were totally wonderful. I wanted to Andean ply the whole thing, so to alleviate the strain on my hand, I held a piece of PVC pipe while I wrapped it. After a bunch was wrapped, I would drop the loop from the end of my finger, and wrap some more. When it was finished, I plied as normal. It resulted in a lot of yarn, which I later set the twist in.
26.3.08
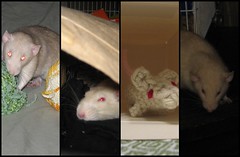
head sitting
Jacques did get a new buddy. They are just getting used to each other, but it's working out. Jacques now endures many or the bizarre behaviors that he did to Arcanus. To begin with, Parsley sits on his head.
Parsley also destroys boxes even more intently than Jacques does. He demolishes each edge.

Parsley also destroys boxes even more intently than Jacques does. He demolishes each edge.
25.3.08
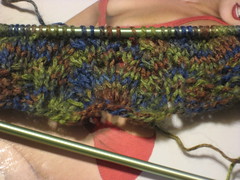
zelda hemline
I started zelda, from Naughty Needles. It seems like the perfect thing to use my SWTC Bamboo for. I completed the first pattern repeat. It goes fairly quickly, but I already know I'll be working on it in bunches at a time because I only have metal needles in that size.
I'm probably going to use a pattern from here for a bathing suit, also. The patterns are written the way I like to read them, so it's really satisfactory. An added bonus, all her finishing example photos are in a yarn that I have, but don't have the ball band for, so I might finally find out what it is.
I'm probably going to use a pattern from here for a bathing suit, also. The patterns are written the way I like to read them, so it's really satisfactory. An added bonus, all her finishing example photos are in a yarn that I have, but don't have the ball band for, so I might finally find out what it is.
18.3.08
Arcanus
Arcanus went to the vet today. He had his surgery, and then died when they brought him out of anesthesia. He was sweet.
Now Jacques is alone. He needs other rats to live a real ratty life. I don't know exactly where I would get him a new friend. I can't tell if he notices that Arcanus is not here.
17.3.08
Plying on my Drop Spindle
I made this short video to show how I ply yarn on my spindle. There is no sound, but that was better than the video game music that was there before.
I have my two singles posted in a box resting on an old spinning wheel. They are pointed downward so that gravity holds the needles in the box. When I'm not spinning, the spindle fits through the slats on the uprights for the wheel.
I ply the two singles together, and then check the twist. If it's over or under twisted, I correct before winding it up. Then there is less to set later.
 My cardboard box lazy kate.
16.3.08
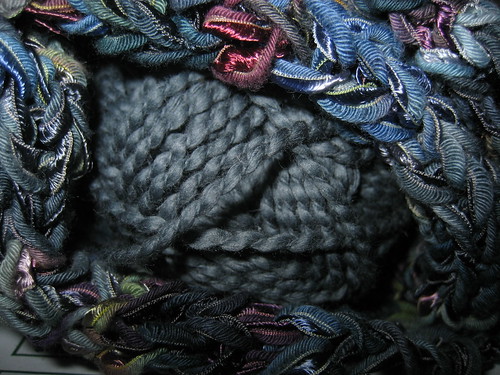
yarn construction

I've spent this past week's evenings creating this self-striping yarn. It doesn't have a purpose, yet, but who cares? Eventually I'll come up with something to do with it. It's made from many varieties of wool and fiber from a http://luxe.etsy.com spinning kit. This one was named higgledy piggledy bits n' pieces.
Being the second one I made, the balance of the two plies was much closer than the last time. I'm also more satisfied with the coils. I haven't uploaded any pics of the finished yarn, but I'll do that today. There's still a pile of stuff left over from this kit, which I couldn't quite fit into this yarn. I'm going to combine it with the last kit's leftovers and make a third - probably a wrapped single.

Subscribe to:
Posts (Atom)


